Working With Multiple Wikis
Background
When starting out making a wiki for yourself you may have files for every topic you wanted to cover. You may have organized those files into different directories each one containing documents on different topics. If however you wanted to publish all these documents online it may be unwise to place them in a single wiki as users searching for documents from topic_A may retrieve documents from topic_B that make reference to topic_A or simply include keywords also used by topic_A. Another issue that can arise is managing changes to the wiki. For wikis managed in git, one can face pull requests containing changes across a variety of different topics. This may become overwhelming to manage / moderate.
Because of these issues we propose a structure where each wiki gets its own repository. Additionally there can be one wiki that enables users to search across all other wikis for when the need arises. This leads to its own issue however, how to manage all of these different repositories. To get a global view of the documentation as well as provide a easy way to dip into and edit documentation in any wiki we propose a repository that initializes submodules for each of the different wikis. This is the structure we use for WikiHub
Search Through Multiple Wikis with A Global Wiki (WikiHub)
Note
For more information visit Read The Docs: Subprojects
We first start by creating a new wiki we can host online with Read the Docs. To do so follow the steps in the section Create Your Online Wiki From A Template.
Next we navigate to the project dashboard on Read The Docs and click the ⚙ Admin button.
Select Subprojects from the sidebar and add your other subprojects (wikis) you want to be able to search through from your global wiki.
*May Not Be Necessary) Navigate back to your project dashboard and rebuild your project by selecting the Builds button. Then on the builds page click the Build Version: button to rebuild versions of your project.
After you follow the above steps you should be able to go to the global wiki’s documentation, enter keywords in the search bar. And see search results from all of the wikis you included as subprojects.
Managing Multiple Wikis
Note
This involves using PyCharm
Because we access all wikis from a single PyCharm project, we assume we are using the same version of sphinx and python across all project (e.g. all wikis were setup with Python 3.8)
With each of your wikis contained in different repositories you could simply navigate to each repository when you want to add changes. However if you want to have a single place to view and edit wikis across multiple repositories I have found the following workflow to work for me:
To start we create a new project
With PyCharm open select File > New Project…
Choose your project location. (e.g.
C:\PycharmProjects\test_wiki)Under Python Interpreter create a new environment using Conda
Select your python version (For this example we will use
3.8)Click the Create button to create your project.
With PyCharm open select File > New Project…
Choose your project location. (e.g.
C:\PycharmProjects\test_wiki)Under Python Interpreter create a new environment using Conda
Select your python version (For this example we will use
3.8)Click the Create button to create your project.
Once the project is created select the terminal emulator at the bottom of the PyCharm window. From the terminal run the followng:
# Clone each wiki repository
$ git clone git@github.com:JeffCube99/WikiHub.git

# Inside ach wiki repository Set your git credentials
# (If you contribute to the wikis under a different name and email)
$ cd WikiHub
$ git config --local user.name "JeffCube99"
$ git config --local user.email myemail@gmail.com
$ cd ..

# Install Sphinx.
# During this process conda will ask for your permission you to proceed (``Proceed ([y]/n)?``).
# To continue just type ``y``
$ conda install sphinx

# Install any dependencies of the other wikis.
# For example if a wiki uses the "sphinx-rtd-theme" run  $ pip install sphinx-rtd-theme
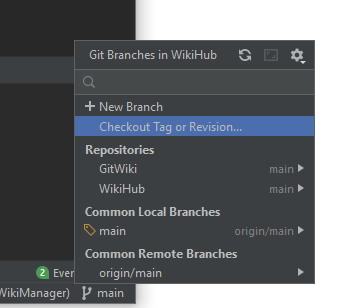
With the project setup you can now manage the branches of your wikis using the git widget at the bottom of the pycharm window:
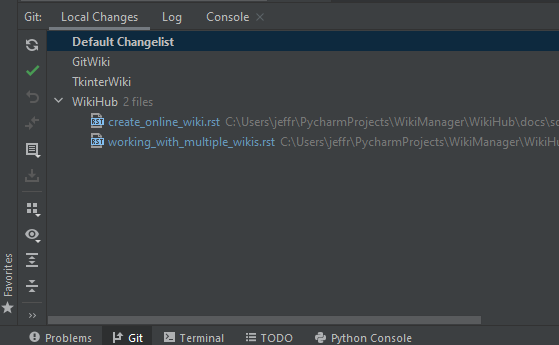
Changes made to files appear within the Local Changes tab which is visible when clicking on the Git tab at the bottom of the pycharm window. By default any new changes appear in the active changelist which is named the Default Changelist. To better organize your changes you can create a changelist for each wiki by right clicking inside the Local Changes window and select New Changelist. When you edit a new file and it appears under the Default Changelist you can then drag it and drop it to one of the wiki changelists you have created. You can see an example of this organization below:
When committing changes using PyCharm’s version control window, select the changelist you want to commit before clicking the commit button (that looks like a green chechmark). When reviewing the commit make that it contains only from the repository you intend to commit the changes to, otherwise you will create a commit across multiple repositories (with the same commit message as well).
When you want to generate HTML documentation in a wiki. Open the pycharm terminal and navigate to the
docsfolder in the wiki and run themake htmlcommand. For more instructions on viewing your wiki on a browser see Viewing A Local Wiki.